04_projects:03_rpi2040_pico_mmu
This is an old revision of the document!
| 3D PRINTING AND DESIGN REFERENCE DOCUMENT |
|
|---|---|
| Document Title: | A Klipper based MCU using a RPI Pico to create an MMU |
| Document No.: | 1755550497 |
| Author(s): | jattie |
| Contributor(s): | |
REVISION HISTORY
| Revision | Details of Modification(s) | Reason for modification | Date | By |
|---|---|---|---|---|
| 0 | Draft release | Document description here | 2025/08/18 20:54 | jattie |
Raspberry Pi Pico MMU - Set up the Pico
The aim of this project is to build on the work of others that already exist, to learn some and dabble in new things and combine that with 3D printing and 3D design, electronics and controls.
So the idea is to build a Multi Material Unit(MMU) for my Creality K1 Max and document the journey here. I considered simply upgrading to a K2 or to go the K1 upgrade route, but it's costing too much for a feature that has such a low hardware cost, I am not convinced the costs justifies the use of my printers and in doing this project, I have a fun project to work on, tinker with Klipper that I have very little experience of, apart from previously rooting my K1 Max. Also having built the sandtable project using a PI Pico 2040, I thought it might be fun to use the stock I have and repeat the process of fitting the technical lego pieces together.
After some research and many articles later, I decided to try out the LH-Stinger Pico MMU. It is well documented and so many options that it becomes quite overwhelming, but I believe that it can be integrated with a rooted K1 Max is reasonable fashion, with the caveat that I want to explore using the Raspberry Pi Pico 2040 as a controller instead.
The theory is that you can flash a RPI Pico 2040 with Klipper and once that is achieved you simply define the IO pins for stepper and servo control in Klipper scrips.
The Basic Steps
- Install Klipper on a PC
- Create a Configuration
- Build the configuration
- Flash the binary to the Raspberry PI Pico 2040
- Connect the board to the main host application
Install Klipper on a PC
git clone https://github.com/Klipper3d/klipper
cd klipper
make menuconfig
Create a Configuration
Make Menuconfig brings up this application to easily chose and select options from.
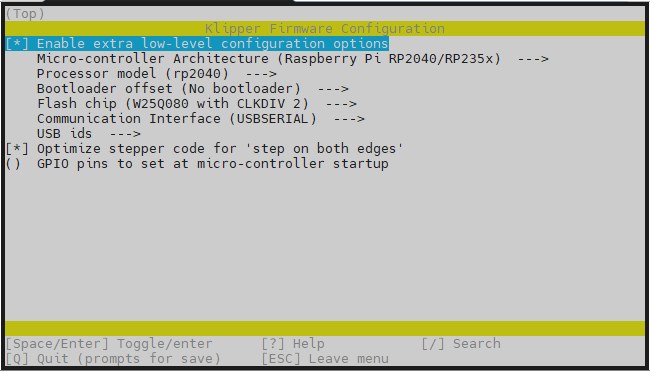
For my test I chose the options as shown above.
The documentation I could find states the following:
| Option | Recommended Setting | Why |
|---|---|---|
| Enable extra low-level configuration options | ✅ Enabled | Required for RP2040-specific tuning |
| Micro-controller Architecture | Raspberry Pi RP2040/RP235x | Matches your board |
| Processor model | rp2040 | Correct for Raspberry Pi Pico |
| Bootloader offset | No bootloader | Pico uses drag-and-drop UF2 flashing |
| Flash chip | W25Q080 with CLKDIV 2 | Default for most Pico boards; safe choice |
| Communication Interface | USBSERIAL | Needed to connect via USB to your K1 Max |
| USB IDs | Leave default | Optional unless you need custom device IDs |
| Optimize stepper code for 'step on both edges' | ✅ Enabled | Improves stepper performance (recommended) |
| GPIO pins to set at micro-controller startup | Leave blank | Only needed for special pin initialization |
Build the configuration
jattie@Jattie-PC:~/klipper$ make
  Building out/autoconf.h
  Compiling out/src/sched.o
make: arm-none-eabi-gcc: No such file or directory
make: *** [Makefile:65: out/src/sched.o] Error 127
That error means your system is missing the ARM cross-compiler toolchain—specifically arm-none-eabi-gcc, which is required to compile firmware for ARM-based microcontrollers like the RP2040.
This is resolved by installing the missing tools
jattie@Jattie-PC:~/klipper$ sudo apt update
sudo apt install gcc-arm-none-eabi binutils-arm-none-eabi libnewlib-arm-none-eabi
Build then runs to completion as expected.
jattie@Jattie-PC:~/klipper$ make
  Compiling out/src/sched.o
  Compiling out/src/command.o
  Compiling out/src/basecmd.o
  Compiling out/src/debugcmds.o
  Compiling out/src/initial_pins.o
  Compiling out/src/gpiocmds.o
  Compiling out/src/stepper.o
  Compiling out/src/endstop.o
  Compiling out/src/trsync.o
  Compiling out/src/adccmds.o
  Compiling out/src/spicmds.o
  Compiling out/src/i2ccmds.o
  Compiling out/src/pwmcmds.o
  Compiling out/src/buttons.o
  Compiling out/src/tmcuart.o
  Compiling out/src/neopixel.o
  Compiling out/src/pulse_counter.o
  Compiling out/src/lcd_st7920.o
  Compiling out/src/lcd_hd44780.o
  Compiling out/src/spi_software.o
  Compiling out/src/i2c_software.o
  Compiling out/src/thermocouple.o
  Compiling out/src/sensor_adxl345.o
  Compiling out/src/sensor_lis2dw.o
  Compiling out/src/sensor_mpu9250.o
  Compiling out/src/sensor_icm20948.o
  Compiling out/src/sensor_hx71x.o
  Compiling out/src/sensor_ads1220.o
  Compiling out/src/sensor_ldc1612.o
  Compiling out/src/sensor_angle.o
  Compiling out/src/sensor_bulk.o
  Compiling out/src/sos_filter.o
  Compiling out/src/load_cell_probe.o
  Compiling out/src/rp2040/main.o
  Compiling out/src/rp2040/watchdog.o
  Compiling out/src/rp2040/gpio.o
  Compiling out/src/rp2040/adc.o
  Compiling out/src/generic/armcm_boot.o
  Compiling out/src/generic/armcm_irq.o
  Compiling out/src/generic/armcm_reset.o
  Compiling out/src/generic/crc16_ccitt.o
  Compiling out/src/rp2040/timer.o
  Compiling out/src/generic/timer_irq.o
  Compiling out/src/rp2040/bootrom.o
  Compiling out/src/rp2040/usbserial.o
  Compiling out/src/generic/usb_cdc.o
  Compiling out/src/rp2040/chipid.o
  Compiling out/src/rp2040/hard_pwm.o
  Compiling out/src/rp2040/spi.o
  Compiling out/src/rp2040/i2c.o
  Building out/compile_time_request.o
Version: v0.13.0-213-gd34d3b05b
  Building rp2040 stage2 out/stage2.o
  Preprocessing out/src/rp2040/rpxxxx_link.ld
  Linking out/klipper.elf
  Building out/lib/elf2uf2/elf2uf2
  Creating uf2 file out/klipper.uf2
Flash the binary to the Raspberry PI Pico 2040
- Plug the Pico into your computer while holding the BOOTSEL button, it will mount as a USB drive.
- Copy klipper.uf2 to the Pico drive, it will reboot automatically.
Test the Connection
- Plug the flashed pico into K1 Max USB Port
- Establish an SSH connection to the K1 Max and found the new serial device.
root@creality /root [#] ls /dev/serial/by-id/
usb-Klipper_rp2040_E66058388361172C-if00
root@creality /root [#]
We seem to have a successful Klipper installation on the Pico 2040.
Connect the board to the main host application
Some basic testing to confirm all is well, add the basic config and simply blink the LED on the Pico 2040.
[mcu pico_2040_mmu]
serial: /dev/serial/by-id/usb-Klipper_rp2040_E66058388361172C-if00

[output_pin pico_led]
pin: pico_2040_mmu:gpio25
pwm: False
shutdown_value: 0
Adding the config and restarting Klipper however yield this error:
MCU Protocol error

This type of error is frequently caused by running an older
version of the firmware on the micro-controller (fix by
recompiling and flashing the firmware).

Your Klipper version is: 09faed31-dirty
MCU(s) which should be updated:
mcu: Current version 1.3.0.40-5-g6977eaff-dirty-20230711_100121-ubuntu
nozzle_mcu: Current version 1.3.0.40-5-g6977eaff-dirty-20230711_100254-ubuntu
leveling_mcu: Current version 1.3.0.40-5-g6977eaff-dirty-20230711_095416-ubuntu
Up-to-date MCU(s):


Once the underlying issue is corrected, use the "RESTART"
command to reload the config and restart the host software.

mcu 'pico_2040_mmu': Multi-byte msgtag not supported
So we have a fundamental issue of Klipper preventing different versions of Klipper from communicating. In order for the K1 Max to talk to the Pico 2040 boards we have to match the version of Klipper on the K1 Max with the same version of Klipper installed in the Pico 2040 board.
After almost giving up I eventually managed to get this resolved. The published version of Klipper from Creality is not publishing all the parts required to compile the sources.
  Building out/compile_time_request.o
Version: V1.3.3.5-1-g2477a064
  Building rp2040 stage2 out/stage2.o
make: *** No rule to make target 'out/src/prtouch_v2.o', needed by 'out/klipper.elf'.  Stop.
Resolving the Compile Errors
Apply the following edits to Makefile:
- On line 50 comment out prtouct_v2.o
- On lines 108 and 109 remove references to prtouch_v2.o
#target-y += $(OUT)src/prtouch_v2.o
#$(OUT)klipper.elf: $(OBJS_klipper.elf) $(OUT)src/prtouch_v2.o $(OUT)hostCrc16.elf
#       @echo "  Linking $@"
#       $(Q)$(CC) $(OBJS_klipper.elf) $(OUT)src/prtouch_v2.o $(CFLAGS_klipper.elf) -o $@
#       $(Q)scripts/check-gcc.sh $@ $(OUT)compile_time_request.o

$(OUT)klipper.elf: $(OBJS_klipper.elf) $(OUT)hostCrc16.elf
        @echo "  Linking $@"
        $(Q)$(CC) $(OBJS_klipper.elf) $(CFLAGS_klipper.elf) -o $@
        $(Q)scripts/check-gcc.sh $@ $(OUT)compile_time_request.o
After these edits the next error then is:
/home/jattie/k1_max_clipper/src/sched.c:264: undefined reference to `prtouch_task'
collect2: error: ld returned 1 exit status
make: *** [Makefile:115: out/klipper.elf] Error 1
Inspect the sched.c file on line 164 and comment out these references to prtouch too:
#if CONFIG_MACH_LINUX
                    irq_wait();
#else
                                        asm volatile("cpsie i" ::: "memory");
                                        extern void prtouch_task(void);
                                        prtouch_task();
#endif
#if CONFIG_MACH_LINUX
                    irq_wait();
#else
                                        asm volatile("cpsie i" ::: "memory");
//                                        extern void prtouch_task(void);
//                                        prtouch_task();
#endif
The last step is to edit the python build script:
######################################################################
# Wire protocol commands and responses
######################################################################

# Dynamic command and response registration
class HandleCommandGeneration:
    def __init__(self):
        self.commands = {}
        self.encoders = []
        self.msg_to_id = dict(msgproto.DefaultMessages)
        self.messages_by_name = { m.split()[0]: m for m in self.msg_to_id }
        self.all_param_types = {}
        self.ctr_dispatch = {
            'DECL_COMMAND_FLAGS': self.decl_command,
            '_DECL_ENCODER': self.decl_encoder,
            '_DECL_OUTPUT': self.decl_output
        }
    def decl_command(self, req):
        if "prtouch" in req or "get_pres" in req or "get_steps" in req or "step_prtouch" in req:
            return
        funcname, flags, msgname = req.split()[1:4]
Adding the line if “prtouch” in req or “get_pres” in req or “get_steps” in req or “step_prtouch” in req: return avoids generating any of the undesired references to prtouch.
The make command should now run successfully creating klipper.uf2 This is the file flashed to the RPI Pico 2040.
  Building out/compile_time_request.o
Version: V1.3.3.5-1-g2477a064-dirty-20250820_190411-Jattie-PC
  Building rp2040 stage2 out/stage2.o
  Compiling and Linking out/hostCrc16.elf
  Preprocessing out/src/rp2040/rp2040_link.ld
  Linking out/klipper.elf
  Building out/lib/rp2040/elf2uf2/elf2uf2
  Creating uf2 file out/klipper.uf2
This latest Creality Release at the time of writing can be downloaded from here: Version: V1.3.3.5-1-g2477a064-dirty-20250820_190411
Download the zip file and extract the binary.
Flash the RPI Pico 2040
Now that we have a binary file, hold the Bootselect button and plug in the pico, drop the binary and the pico and you're done. Onece it detect the binary the usb drive disappears and flashing is done.
Test the connection from Klipper
Plug in the flashed Raspberry Pi Pico 2040 on the Creality printer USB port and upload the configurations below.
For the most basic testing on Klipper you simple need the following three entries in the printer.cfg file.
- printer.cfg
[mcu pico_2040_mmu]
serial: /dev/serial/by-id/usb-Klipper_rp2040_E66058388361172C-if00

[output_pin pico_led]
pin: pico_2040_mmu:gpio25
pwm: False
shutdown_value: 0

[gcode_macro BLINK_LED]
gcode:
    {% for i in range(10) %}
    SET_PIN PIN=pico_led VALUE=1
    G4 P500
    SET_PIN PIN=pico_led VALUE=0
    G4 P500
    {% endfor %}
For the first entry establish an ssh connection1) to the printer and run ls /dev/serial/by-id and fill in the detail for serial as shown in the example.
Step two set up gpio25 that is connected to the onboard LED. On the klipper console you can use the commands SET_PIN PIN=pico_led VALUE=1 and SET_PIN PIN=pico_led VALUE=0 to turn the onboard LED on and off.
You can also run the BLINK_LED Macro in the list of macros and that will cycle the LED on and off ten times.
When this is achieved you have the setup for creating any new peripheral for you Klipper based 3D printer by expaning macros and using existing setups created for MMU's etc.
Implementing Pico MMU
Now that we have an established connection we need to:
- Acquire the hardware components
- 3D print the Pico MMU Parts
- Assemble and configure the MMU
Hardware BOM
The original hardware BOM is from the Pico MMU Page with links added for the screws.
| Item | Quantity | Image | Delivered Cost | Quantity | |
|---|---|---|---|---|---|
| EMAX ES3004 Servo (EMAX) | 1 |  | €14.39 | 1 | €14.39 |
| Nema 17 (max 40mm length) | 1 | 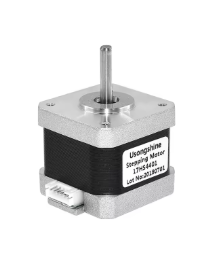 | €15.00 | 1 | €15.00 |
| Steel D-Shaft 5mm x 90mm ** | 2 |  | €9.38 | 5 | €3.75 |
| Bearing MR115 | 4 |  | €7.99 | 10 | €3.17 |
| Bearing MR83 | 4 |  | €7.01 | 10 | €2.81 |
| BMG Hardened Drive Gears (with grub screw) | 4 pairs! | 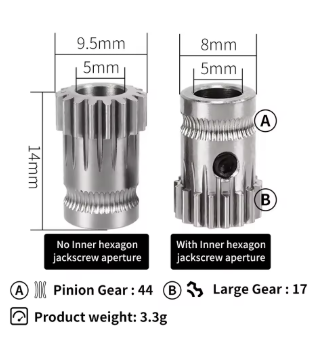 | €8.10 | 4 | €8.10 |
| PTFE Tube 4mm OD, 3mm ID | 1 | 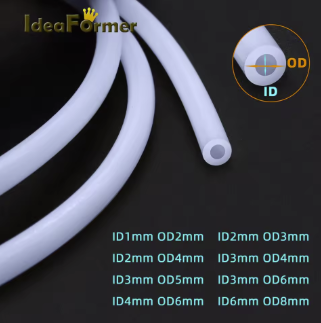 | €1.75 | 1m | €7.00 |
| ECAS 4 Collet | 8 |  | €4.03 | 10 | €3.22 |
| Belt GT2 * | 25cm | 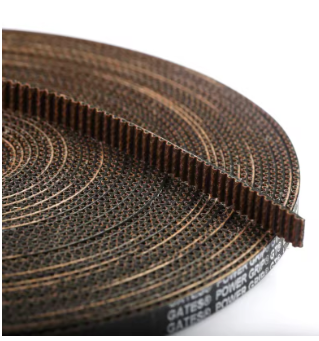 | - | - | €1.00 |
| Heat Insert M3 5mm (D) x 4mm (L) | 23 | 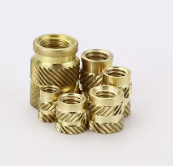 | €7.14 | 100 | €1.64 |
| Screw Cap Head M3 10mm | 3 |  | €1.73 | 50 | €0.10 |
| Screw Cap Head M3 22mm | 2 | €2.94 | 50 | €0.12 | |
| Screw Cap Head M3 30mm | 2 | €3,21 | 50 | €0.13 | |
| Screw Cap Head M3 8mm | 2 | €1.44 | 50 | €0.06 | |
| Screw Countersunk M3 10mm | 12 |  | €2.39 | 50 | €0.57 |
| Screw Countersunk M3 16mm | 4 | €3.31 | 50 | €0.27 | |
| Screw Countersunk M3 8mm | 1 | €1.44 | 50 | €0.03 | |
| Screw Grub M3 6mm (optional) | 2 |  | €1.92 | 55 | €0.04 |
| TOTAL | €61.04 | ||||
Based on the recent sandtable pico controller I anticipate to have similar controller costs that should land a populate board for €25.
| MMU BOM Parts | €61 |
|---|---|
| MMU Printed Parts | €5 |
| MMU Controller | €25 |
| TOTAL | €91 |
Based on an investment cost of €91, I think a DIY Pico MMU is worth the investment costs to get automated spool switching on my K1 Max.
Next Steps
Hardware not featured on the Pico MMU pages are the extras I intend to use for the project:
- Pico 2040 as a Klipper Controller
- Voltage Regulator/Buck Convertor
- Connectors and Powersupplies
04_projects/03_rpi2040_pico_mmu.1755802141.txt.gz · Last modified: by jattie